You’ve probably experienced that satisfying feeling, the one that makes your home sparkle after a good cleaning. But let’s be honest, how often do you truly deep clean? Not just superficial tidying, but an assault on the stubborn grime and dust that lurks in the shadows, defying your everyday efforts. This isn’t about making things look good on the surface; it’s about a complete home revitalization, a thorough purge of the hidden, the forgotten, and the downright disgusting. You’re about to embark on a journey into the uncharted territories of household cleaning, where dust bunnies mutate into dust monsters and soap scum solidifies into an ancient geological formation. Prepare yourself; this guide will equip you with the knowledge and motivation to tackle those hard-to-reach areas, ensuring your home isn’t just clean, but truly pristine.
Arming Yourself: The Essential Tools for the Job
Before you declare war on dirt, you need to ensure your arsenal is fully stocked. Don’t underestimate the power of specialized tools; they are the difference between a frustrating, ineffective struggle and a swift, satisfying victory. Think of yourself as a highly trained cleaning commando, and these are your mission-critical gadgets.
The Versatile Vacuum Accessories
Your standard vacuum cleaner is a powerful ally, but its attachments are your secret weapon for those tricky spots.
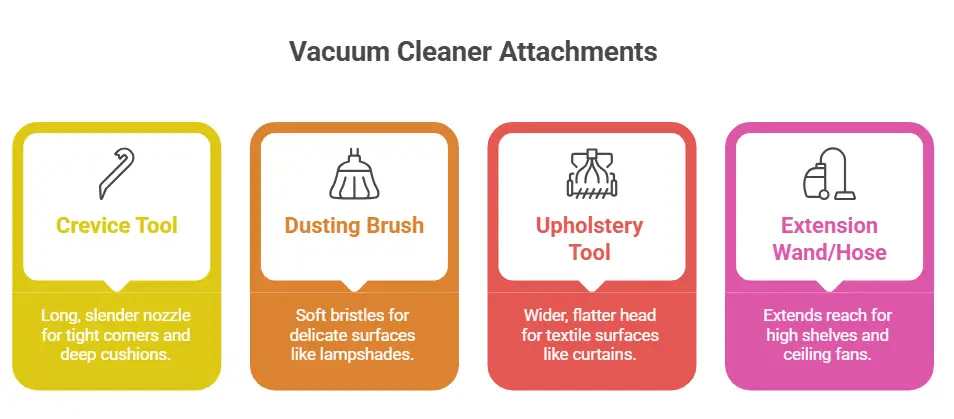
- Crevice Tool: This long, slender nozzle is indispensable for getting into tight corners, along baseboards, and deep within furniture cushions. Imagine trying to extract a rogue crumb from between sofa cushions without it – a futile exercise in frustration! It’s also fantastic for reaching into the nooks and crannies of heating vents and radiator fins.
- Dusting Brush: Soft bristles are a godsend for delicate surfaces like lampshades, electronics, and intricate decorative items. You don’t want to scratch your valuable antiques with a harsh cloth. This attachment gently coaxes dust away without spreading it or causing damage.
- Upholstery Tool: With its wider, flatter head, this attachment is perfect for larger textile surfaces. Think curtains, fabric window blinds, and the entirety of your upholstered furniture. It often has a fuzzy strip to help agitate and lift embedded dirt.
- Extension Wand/Hose: Sometimes, simply extending your reach is the solution. For high shelves, ceiling fans, or the tops of doorframes, an extension wand gives you that extra leverage without needing a precarious climb.
The Power of Microfiber and Beyond
Beyond the vacuum, specific cleaning cloths and brushes will make a world of difference.
- Microfiber Cloths: These aren’t just cloths; they’re dust magnets! Their unique fiber structure traps dust and dirt rather than just pushing it around. Stock up on a variety of sizes and colors for different tasks (e.g., blue for glass, yellow for general surfaces). They can be used wet or dry and are incredibly absorbent.
- Detailing Brushes/Small Brushes: Think old toothbrushes, specially designed cleaning brushes with stiff bristles, or even paintbrushes. These are your precision tools for scrubbing grout lines, intricate carvings, or the tiny crevices in appliance controls. An old toothbrush can work wonders on faucet bases and drain covers.
- Telescoping Poles: For those truly out-of-reach areas like cobwebs on high ceilings or the top of tall cabinets, a telescoping pole with various attachments (duster head, squeegee) is invaluable. Safety first – avoid balancing precariously on chairs!
- Grout Brush: This specialized brush with stiff, angled bristles is specifically designed to tackle the often-neglected grout lines in your bathroom and kitchen. You’ll be amazed at the difference a good scrub can make.
The Ceiling Spectacle: High Up and Hard-to-See
When you think of “hard-to-reach,” your eyes often turn upwards. The ceiling is a forgotten realm of dust, cobwebs, and sometimes, even more sinister surprises. Don’t let your gaze linger solely on eye-level dirt; elevate your cleaning game.
The Whispers of Cobwebs and Dust
Cobwebs are the most obvious offenders, often shimmering almost invisibly until a ray of sunlight catches them. But beyond the webs, a fine layer of dust settles on every horizontal surface, even those high above.
- Ceiling Fan Blades: These are notorious dust accumulators. Before cleaning, turn off the fan at the wall switch to prevent accidental activation. Use an old pillowcase or a specialized fan blade cleaner to clean each blade. Slide the pillowcase over the blade, then pull it back, trapping the dust inside. This prevents dust from raining down on your furniture. For stubborn grime, a damp microfiber cloth with a little all-purpose cleaner might be necessary.
- Crown Molding and Trim: These decorative elements are perfect dust ledges. Use a vacuum with a brush attachment or a telescoping duster to reach them. For painted trim, a slightly damp microfiber cloth can wipe away accumulated grime.
- Light Fixtures: Overhead lights often become a haven for dust and dead insects. Carefully remove any glass covers (if applicable), wash them in warm, soapy water, and dry thoroughly. Wipe down the fixture itself with a damp microfiber cloth. Always ensure the light is off and cool before handling.
- Smoke Detectors and Carbon Monoxide Alarms: These vital safety devices can also collect dust, which can potentially interfere with their operation. Gently wipe them down with a dry microfiber cloth or use the dusting brush attachment on your vacuum. Never spray cleaning products directly onto them.
The Unseen Corners and Vents
Dust and debris aren’t just content with flat surfaces. They seek out hidden nooks and crannies, especially where air circulates.
- Air Vents and Returns: These are often overlooked but can harbor significant dust and even mold spores. Use a vacuum cleaner’s crevice tool or brush attachment to clean the grates. For very dirty vents, you might need to unscrew them, wash them in soapy water, and then reattach them once dry. This improves air quality and system efficiency.
- High Shelves and Cabinet Tops: Out of sight, out of mind – until you reach for that seldom-used serving dish. These flat surfaces accumulate a surprising amount of dust. Use a long-handled duster or a vacuum with an extension wand. For easier future cleaning, consider laying down newspaper or parchment paper on top of cabinets; simply replace it when it gets dusty.
- Curtain Rods and Blinds: Horizontal blinds are notorious dust traps. Close them and dust them from top to bottom with a duster or a damp cloth. For vertical blinds, wipe each slat individually. Curtain rods can be dusted with a long-handled duster. If curtains themselves are dusty, consider vacuuming them with the upholstery attachment or following their care instructions for washing.
The Bathroom Battleground: Grout, Showers, and Beyond
The bathroom, a place of personal hygiene, can ironically become one of the grimiest spots in your home. High humidity, constant use, and the nature of “bathroom dirt” create a breeding ground for mildew, soap scum, and limescale.
Tackling the Tiled Terrors
Tiles and grout are the backbone of most bathrooms, but they also present a unique cleaning challenge.
- Grout Lines: These porous channels between tiles are a magnet for dirt, mold, and mildew. Regularly spray with a specialized grout cleaner or a paste made from baking soda and hydrogen peroxide. Let it sit, then scrub vigorously with a stiff grout brush or an old toothbrush. For extremely stubborn stains, a steam cleaner can be incredibly effective. Consider sealing your grout after a deep clean to make future maintenance easier.
- Shower Heads: Limescale buildup can restrict water flow and look unsightly. Unscrew the shower head (if possible) and soak it in a solution of equal parts white vinegar and water for several hours or overnight. If it’s fixed, tie a plastic bag filled with the vinegar solution around the shower head, ensuring it’s fully submerged. Scrub with a brush afterwards to remove loosened deposits.
- Shower Door Tracks: These narrow channels collect soap scum, hair, and general bathroom grime. Use a small detail brush (like an old toothbrush) and a strong bathroom cleaner or a baking soda paste to scrub them out. Rinse thoroughly.
- Behind the Toilet: This is a truly unpleasant area often skipped during routine cleaning. It’s a hotspot for dust, hair, and splatters. Use a heavy-duty bathroom cleaner and a long-handled brush or a dedicated toilet brush to scrub the floor, the base of the toilet, and the wall directly behind it. Don’t forget to wipe down the back of the toilet bowl itself.
The Unseen Sides of Fixtures
It’s not just the visible parts of your fixtures that need attention.
- Faucet Bases: Water and soap scum seep down onto the base of your faucets, sometimes forming a crusty ring. Use an old toothbrush and a limescale remover or a vinegar solution to scrub around the base where the faucet meets the sink.
- Inside the Toilet Rim: This dark, often wet area is a prime location for mineral deposits and bacteria. Use an angled toilet brush or a stiff brush specifically designed for under-rim cleaning. Pour some toilet bowl cleaner under the rim, let it sit, and then scrub thoroughly.
- Under the Sink and Vanity: While not directly “hard-to-reach” in the same way as high ceilings, the area under the sink is often neglected. Pull everything out, vacuum or wipe down the cabinet interior, check for any leaks, and wipe down pipes. Categorize and declutter items before putting them back.
Kitchen Conquest: Greasy Grooves and Crumby Corners
Your kitchen, the heart of your home, is also a magnet for grease, food splatters, and crumbs. These elements love to hide in unexpected places, leading to lingering odors and unhygienic conditions.
Appliance Evasion Routes
Appliances are the workhorses of your kitchen, and they have many crevices where grime can accumulate.
- Under and Behind Appliances: Pull out your refrigerator and stove (if possible and safe to do so) and prepare for battle. You’ll likely find a horrifying collection of dust, pet hair, and dropped food. Vacuum thoroughly. For the refrigerator coils, use a coil cleaning brush to improve efficiency. Wipe down the floor and walls behind them.
- Dishwasher Edges and Filters: The rubber seal around the dishwasher door can accumulate mold and food debris. Wipe it down with a damp cloth and an all-purpose cleaner. Check and clean the dishwasher filter regularly – this is a major culprit for lingering odors and ineffective cleaning. Most filters twist out and can be rinsed under hot water. For a deeper clean, run an empty cycle with a dishwasher cleaner tablet or a cup of white vinegar on the top rack.
- Underneath the Range Hood Filter: Your range hood filter catches grease, but the area directly above it, inside the hood, also gets greasy. Remove the filter, and then wipe down the interior of the hood with a degreaser. For reusable filters, soak them in hot, soapy water (or a solution of baking soda and water) and scrub with a brush. Dishwasher-safe filters can go in the dishwasher.
- Toaster Crumb Tray: A simple but often forgotten task. Pull out the crumb tray (usually at the bottom) and empty it over the trash. Wipe cleaned tray and the inside of the toaster with a damp cloth.
Cabinet Crevices and Pantry Perils
Cabinets and pantries offer many hiding spots for crumbs and spills.
- Cabinet Tops: Like high shelves, the tops of your kitchen cabinets are prime dust and grease collectors. Use a degreaser and a microfiber cloth. For easier future cleaning, consider lining them with newspaper or wax paper.
- Cabinet Door Crevices: The recessed panels and decorative grooves on cabinet doors can become sticky with grease and cooking splatters. Use a small brush (like an old toothbrush) and a degreaser to scrub these areas clean.
- Pantry Shelves: Over time, spills, crumbs, and even expired food can accumulate. Empty the pantry, vacuum crumbs, and wipe down all shelves with an all-purpose cleaner. Check expiration dates and discard any old items. Consider shelf liners for easier future cleaning.
- Between Counter and Wall: That tiny gap where your countertop meets the wall or backsplash can be a magnet for crumbs and liquid spills. Use a thin knife or a crevice tool on your vacuum to dislodge debris. A small brush can also help scrape out dried-on gunk.
Living Area Loveliness: Dusting the Details
Your living room or family room is where you relax, entertain, and accumulate a surprising amount of dust and grime in unique locations often ignored during quick cleanups.
Furniture’s Forgotten Facets
Furniture, particularly upholstered pieces, offers numerous places for dust and dirt to settle.
- Under and Behind Furniture: Just like with kitchen appliances, pulling out sofas, armchairs, and bookshelves can reveal hidden worlds of dust bunnies, lost items, and general filth. Vacuum thoroughly, paying attention to baseboards and carpeted areas underneath.
- Between Cushion Crevices: Remove all cushions and vacuum the entire frame of your sofa or armchair. Use the crevice tool to get deep into the seams and corners, extracting crumbs, pet hair, and stray coins.
- Legs and Framework of Furniture: Dust settles on the legs, rungs, and unseen framework of tables, chairs, and shelving units. Wipe these down with a damp microfiber cloth, paying attention to carved details.
- Window Sills and Tracks: Window sills accumulate dust, dead insects, and moisture. Wipe them down thoroughly. For sliding window tracks, use a vacuum with a crevice tool to remove loose debris, followed by a damp cloth or detailing brush to clean out the grime.
The Electronic Jungle and Decorative Divides
Our modern lives are filled with electronics and intricate decorations, each a dust magnet in its own right.
- TV Screens and Electronics: These attract dust and fingerprints. Always use a specialized electronics cleaner and a microfiber cloth designed for screens to avoid streaks or damage. For keyboards, use canned air to blow out debris between keys. Don’t forget the backs of TVs and sound systems – they can be surprisingly dusty.
- Lamp Shades and Bases: Dust can settle heavily on both the fabric/material of lamp shades and the often-ornate bases. Use a dusting brush attachment on your vacuum or a lint roller for fabric shades. Wipe down bases with a damp cloth.
- Picture Frames and Wall Decor: Every framed picture, piece of art, or wall hanging is a dust catcher. Gently wipe down frames and glass with a microfiber cloth. For intricate decor, use a soft brush or a dry cloth to dust.
- Baseboards and Doorframes: The often-kicked and overlooked edges of your rooms. Use a damp microfiber cloth or a vacuum brush attachment to wipe away dust and scuff marks. For stubborn grime, a magic eraser can work wonders on painted surfaces. Don’t forget the top edge of doorframes – another prime dust-collecting spot.
By systematically addressing these hard-to-reach areas, you’re not just superficially cleaning; you’re truly revitalizing your living space. You’ll improve air quality, extend the life of your appliances, and enjoy a home that feels genuinely fresh and healthy. This deep cleaning isn’t just about appearances; it’s about creating a thoroughly clean environment that contributes to your well-being. So grab your tools, put on some music, and prepare to conquer the hidden grime – your meticulously clean home awaits!
FAQs
What are hard-to-reach areas in a building or facility?
Hard-to-reach areas in a building or facility are typically spaces that are difficult to access and clean using traditional cleaning methods. These areas may include high ceilings, air vents, light fixtures, ductwork, and other confined spaces.
Why is specialized cleaning necessary for hard-to-reach areas?
Specialized cleaning is necessary for hard-to-reach areas because these spaces often accumulate dust, dirt, and other contaminants that can compromise indoor air quality and create potential health hazards. Regular cleaning methods may not effectively reach these areas, making specialized cleaning techniques essential.
What are some specialized cleaning techniques for hard-to-reach areas?
Some specialized cleaning techniques for hard-to-reach areas include using extendable tools and equipment, such as telescopic poles and high-reach vacuum systems, to access and clean elevated surfaces. Additionally, specialized cleaning solutions and microfiber cloths may be used to effectively remove dust and dirt from confined spaces.
What are the benefits of specialized cleaning for hard-to-reach areas?
The benefits of specialized cleaning for hard-to-reach areas include improved indoor air quality, reduced allergens and contaminants, and a cleaner and more hygienic environment. By effectively cleaning these areas, facilities can also maintain a professional and well-maintained appearance.
When should specialized cleaning for hard-to-reach areas be performed?
Specialized cleaning for hard-to-reach areas should be performed on a regular basis as part of a comprehensive cleaning and maintenance schedule. The frequency of specialized cleaning may depend on factors such as the type of facility, the level of foot traffic, and the presence of specific contaminants. Regular inspections can help determine the appropriate cleaning schedule for hard-to-reach areas.